
Upgrading Your 1992 Corvette Remover Tail Lights for LED Load Resistor
Read Time:4 Minute, 55 Second
The 1992 Corvette possesses lasting legendary status, which owners already recognize. Upgrading your Corvette’s tail lights stands as the top method to elevate its aesthetic appeal and operational efficiency even when dealing with classic automobile models. Replacing old lights with LED technology generates better visibility while giving your car an elegant contemporary style. But what happens if you install LEDs and notice issues like hyper-flashing or malfunctioning signals? The solution lies in installing an LED load resistor. In this guide, we’ll walk you through everything you need to know about removing your 1992 Corvette remover tail lights for LED load resistor installation.
Why Upgrade to LED Tail Lights?
The following portion examines the multiple advantages that make LED tail light upgrading a worthwhile investment.
- Improved Visibility: The brightness of LEDs surpasses standard bulbs which helps drivers identify your vehicle during nighttime.
- Energy Efficiency: The lower power consumption of LEDs will benefit your Corvette’s electrical system since power consumption is reduced.
- Longer Lifespan: LEDs have a longer lifespan than incandescent bulbs which decreases your replacement expense.
- Modern Aesthetic: LEDs enable your Corvette to display a distinctive bright and focused light source which upgrades its total appearance.
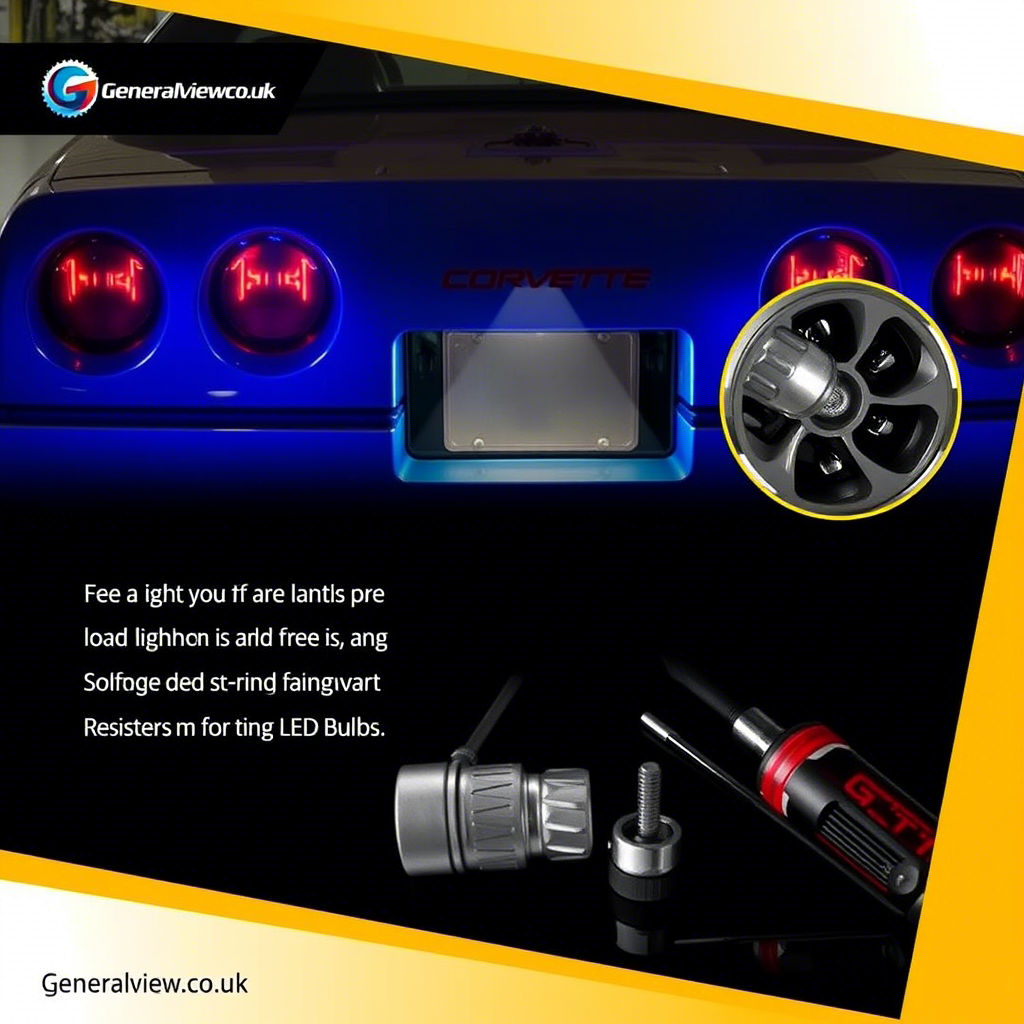
Upgrading to LED lights presents a major challenge when the upgrade has to work with older vehicles such as the 1992 Corvette. LED load resistors act as the solution to resolve this issue.
What Are LED Load Resistors?
Your Corvette may struggle to comprehend the low current intake of LEDs compared to normal vehicle bulbs. Using LED load resistors prevents your Corvette from developing errors on dashboards and signal hyper-flash issues. žit leads the automotive system to misinterpret a functional standard bulb while using LED load resistors as electrical stand-ins for standard bulbs.
For your 1992 Corvette remover tail lights, installing load resistors ensures the smooth operation of your new LED setup.
Tools and Materials Needed
Before starting the process, gather the following tools and materials:
- Socket wrench set
- Screwdriver (Phillips and flathead)
- Electrical tape
- Wire strippers
- Heat shrink tubing or electrical connectors
- LED load resistors (rated for your vehicle’s electrical system)
- New LED tail light bulbs
Step-by-Step Guide: Removing Tail Lights and Installing Load Resistors
Step 1: Prepare Your Vehicle
- Place your Corvette on a level ground then switch off the engine.
- Delete the negative battery cord to stop electrical damage.
1 Step 2: Access the Tail Lights
- Begin by opening the Corvette trunk or rear hatch.
- Find all bolts and screws that hold the tail light assembly. The required fasteners exist within the trunk compartment.
- A socket wrench or screwdriver should be used to disconnect the fasteners.
Step 3: Remove the Tail Light Assembly
- You should isolate the tail light assembly from the car body by gently pulling it.
- Separator the tail light wiring harness from its connection.
1 Step 4: Replace Bulbs with LEDs
- Twist incandescent bulb sockets to the left to remove them.
- You must now fit the new LED bulbs inside the sockets before both sealing and securing them properly.
Step 5: Install the LED Load Resistors
- Locate the wires that feed the turn signal along with the brake light functions.
- The LED load resistor needs installation on wires by using wire strippers and connectors. Fasten the resistor appropriately.
- The connections should be wrapped with electrical tape or heat shrink tubing to stop short circuits from forming.
Step 6: Reassemble the Tail Lights
- Reconnect the wiring harness to the tail light assembly.
- Secure the tail light assembly back onto the car using the original bolts or screws.
- Test the lights to ensure they function correctly.
Comparing Traditional Bulbs vs. LEDs
To help you understand the benefits of upgrading, here’s a comparison table:
| Feature | Traditional Bulbs | LED Bulbs |
|---|---|---|
| Brightness | Moderate | High |
| Power Consumption | High | Low |
| Lifespan | 500-1,000 hours | 50,000+ hours |
| Compatibility | Direct fit | May requireload resistors |
| Aesthetic | Standard | Modern and sleek |
Common Issues and Solutions
Issue 1: Hyper-Flashing Turn Signals
- Cause: The car’s flasher relay detects low currents from the LEDs.
- Solution: Install LED load resistors to simulate the load of traditional bulbs.
1 Issue 2: Dashboard Error Messages
- Cause: The car’s computer senses a “bulb out” condition.
- Solution: Use LED load resistors to resolve the issue.
Issue 3: Flickering Lights
- Cause: Voltage fluctuations or poor-quality LEDs.
- Solution: Ensure you’re using high-quality LEDs and properly installed resistors.
FAQs About 1992 Corvette Remover Tail Lights for LED Load Resistor
Q1: Do I need load resistors for all my tail lights?
A: No, load resistors are typically needed only for turn signals and brake lights, as these circuits are monitored by the car’s electrical system.
Q2: Can I install load resistors myself?
A: Yes, with basic tools and some patience, you can install load resistors on your 1992 Corvette remover tail lights without professional help.
1 Q3: Will load resistors affect my car’s performance?
A: No, load resistors simply mimic the electrical load of traditional bulbs and won’t harm your vehicle’s performance.
Q4: How do I choose the right load resistor?
A: Select a resistor rated for your vehicle’s electrical system (usually 6 ohms, 50 watts for most cars).
Q5: Are there alternatives to load resistors?
A: Installing an LED-compatible flasher relay represents an expensive and complex alternative to standard flasher relays in cars.
Conclusion
Upgrading your 1992 Corvette remover tail lights for LED load resistor installation is a fantastic way to modernize your classic car. LEDs enhance driving safety while simultaneously decreasing power usage through their implementation. Using load resistors to solve potential problems with hyper-flashing makes the upgrade process smooth and efficient. The right tools combined with some patience lead to an upgraded Corvette lighting system that will turn heads on the road.
The project guide contains everything needed to finish successfully regardless of your experience level in DIY or otherwise. You can give your 1992 Corvette the LED transformation it needs by using your tools and effort.
Happy
0 %
Sad
0 %
Excited
0 %
Sleepy
0 %
Angry
0 %
Surprise
0 %

Average Rating